Showing posts with label Gift Giving. Show all posts

Sunday, August 2, 2015

Driftwood Votive - a creative project


Ever since a friend of mine described a serene sea-themed bedroom project that she was planning, I have had in mind the idea to make a driftwood votive for her newly painted dresser. The first step was to buy a glass container (mine came from a thrift shop), then to find driftwood pieces with similar diameters down by the beach.


After giving them a good washing and time to dry completely, I selected the ones I wanted to use and cut them to length.  I had decided that I wanted some of the glass to show at the top.


Using a rubber band to keep the sticks in place, I placed the sticks around the outside of the jar, choosing each one to fit well next to the other. Once all were in place I carefully applied a small amount of glue between each stick, at the points where one stick touched the other. Don't worry about too much glue, you can use a toothpick to smooth away the excess glue. Choose a glue that is suitable for wood and that dries clear. I used two bands during the gluing process and kept the rubber bands in place until the glue was completely dry.


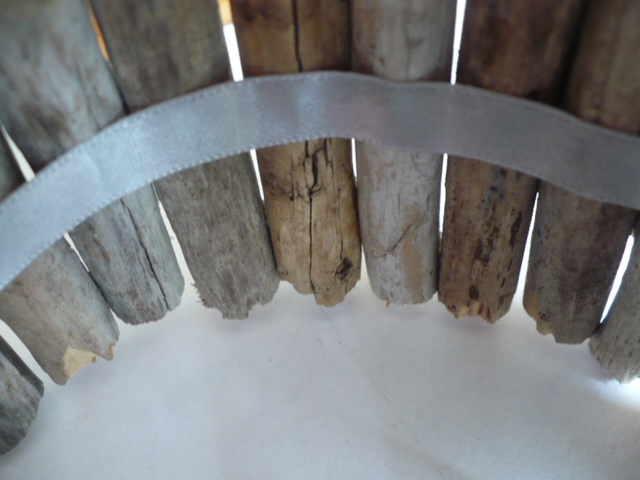
Once dry, I removed the rubber bands and carefully lifted the glass out of the driftwood ring.  I then cut a ribbon and glued it to the driftwood on the inside of the circle.  It is better to glue a ribbon towards the top of the sticks and another at the bottom.  This will reinforce the ring, should some of the glue between the sticks come apart.


Once the ribbons are securely glued to the sticks, gently place the glass jar inside the ring. The driftwood votive is now ready for a candle.


You can also use the driftwood votive as a vase, or as a container for any other number of things!


Wednesday, May 27, 2015

Little White Jug


Here I am, almost one year to the day since my last post. How could so much time have passed? A longer break than I anticipated, but here I am feeling inspired once again and raring to go.

I thought I would mark the occasion with a blog about my little white Lord Nelson Pottery jug from England.  This jug is very special to me because it was a gift from my lovely friend S.  She and I were on an antiquing trip in Almonte, Ontario and S. found this jug at one of the shops, fell in love with it, bought it and took it home. Some time later, she surprised me by giving it to me, not because she did not love it anymore, but because she knew how much I loved it.  Now that, is a special friend.

I picked the flowers this morning from my garden. Alliums from the bulbs that I planted last fall.

 
Siberian irises, which I just love. These are a dark blue purple and the clumps that they form are full of spiky thin green leaves. They don't last long but their slender elegance makes them a favourite of mine.


And last, but not least, in this lovely trio is a perennial bachelor button, more larger and showier than the annual variety.  This year, mine are much larger than I have ever seen them grow in my garden. Their spiky spheres are remarkable.


Put all three together and they are even more beautiful.  Have a look and see what you think...


I think they work so well in contrast with the simplicity of my little white jug.  I also think that I will continue to make other flower arrangements in this jug and share them here so you can see just how versatile this wonderful receptacle is. I am willing to bet that the mood of the arrangement will change with the flowers. Time will tell.


Wednesday, November 20, 2013

Victorian Dinner Party #16


This lovely two-volume set of  Le Marchand d'antiquites, the French version of Charles Dickens's The Old Curiosity Shop was published in Paris in 1942. It was a hostess gift given to me by friend R. at my Victorian dinner party. How wonderfully appropriate was that, and I pressed into service as part of the decor immediately.


A stamp on the title page reveals that it was part of  the "Location de livres francais et anglais" in Paris at one time...


with its location on the shelf marked by the consecutive nos. 523 and 524 on labels affixed to the spine.


There are lovely marbled covers clearly showing a well worn patina...


as do the covers' edges and wavy pages. All of these signs of its age come together to make a beautiful artifact, which exudes the feeling a past time. 

Friday, October 26, 2012

Surprise Packages


It's such fun to surprise someone with a themed package, so now that I have a nephew who is away at university I thought it would be fun to create a Halloween-themed package to send to him. 


First place to start was with some baking: meringue bones and almond shortbread witches' fingers.


Then a selection of Halloween candies: salt-water taffy pumpkin faces and ghostly chocolates.


Added in a black cherry-flavoured skull lollipop...


and an elegant mask, a tiny pumpkin that can be turned into a Jack o'lantern by drawing on a face with black marker, salt-water taffy treats and candy sticks in Halloween colours.


Mustn't forget a pair of bloody eyeballs.


Those witches' fingers really are creepy...


 Best to hide them away in a box packed with black construction paper that I put through the shredder.  I've sealed the box tight and mailed it off!


Thursday, December 22, 2011

Quick Christmas Cards


If you find that you've run out of Christmas cards, and just need a few more, don't go out a buy a whole box, consider making some.


These two designs are deceptively simple and just require paper, some glue, and a little strategic cutting.


Fold a piece of paper in two to make a card, then trace half a star (or half a tree) along the fold. Cut out around the shape, but do not cut at the fold. Then using the cut-out shape, trace around the star onto a contrasting paper, this time tracing a whole star. Cut out the star. Open the card up and glue the contrasting star onto the first star.


Open the card, making sure that the star is bent so that it sticks away from the card. Your card is done!


Follow the same instructions for this card, except, instead of cutting and gluing the whole tree shape in contrasting paper to the inside of the card, cover the whole of the right-hand side of the card in a contrasting paper. Your tree will then become half one paper, and half the other.

If you have edging scissors, you can cut a decorative edge along the side of the card.

Friday, December 16, 2011

Gift Tags


Gift tags are one of those things you often forget to buy and only remember once faced with a wrapped gift. But they are such an easy thing to make. If you have blank tags, then it is as simple as drawing on a design with pastels, as above.

Simply gluing on a spare button makes a gift tag that is, well... cute as a button.


If you have a little more time, you can get out some markers and create something that is slightly more elaborate but still light-hearted. Best of all, you can match the tag to the giftwrap.


The key is not to stress. Almost any small scrap of paper can become a gift tag. Everyone knows about cutting up old Christmas cards to make gift tags, but any interesting paper can be used. Soaps often have beautifully designed wrappers so they are good candidates. Look around at the packaging on things you have at hand, and see what you can re-use as gift tags.

Sunday, December 11, 2011

Gingerbread Cakes


There's nothing quite like the delicious smell of gingerbread baking. And I have to say the taste is one of my absolute favourites. There is something old-fashioned and so cozy and comforting about the smell and taste of deep and rich spicy gingerbread.

I had decided that this year I was not only going to make gingerbread in a loaf pan but that I was going to make some mini gingerbread in small fluted tins.

While the large of the tins was non-stick, the smaller ones were old vintage tins. Instead of coating with oil and flour I oiled them and then sprinkled cocoa in them, so that I wouldn't end up with big white flour lumps when I turned them out. The oil and cocoa powder, worked like a charm, they slid out easily once baked.

The small tins are just two inches across, making them two-bite size. The "larger" tins are also quite small, only three inches across. Just enough for two servings. Either size is perfect for giving as gifts, especially if you like to give an assortment of baking and want things to be sampling size.

They look lovely straight from the pan, but I also like to sprinkle them with icing sugar as if they had just had a light dusting of snow.


The recipe I use makes a truly delicious moist gingerbread with rich flavour and comes from the Crabtree & Evelyn Cook Book, c1989. Here, with a few changes of my own, is the recipe.

English Gingerbread

Ingredients:
2 1/2 cups flour
1 1/2 teaspoons ground ginger
1 teaspoon ground cinnamon
1/2 teaspoon ground cloves (I use allspice)
1/4 teaspoon salt
1/2 cup butter
1/2 cup brown sugar
1/2 cup molasses
1/2 cup corn syrup
1 teaspoon grated lemon zest
1 tablespoon ground gingerroot (optional)
2 eggs
2 teaspoons baking soda
1 cup boiling water
3 tablespoons icing sugar (to dust with once baked and cooled)

Instructions:
Preheat oven to 350 degrees F.

In saucepan, melt and mix in brown sugar, molasses, and corn syrup. Stir over low heat until well dissolved and mixed. Remove from heat and cool slightly.

In mixing bowl, combine flour, spices, lemon zest and salt. Add butter mixture and eggs in center of dry ingredients. Stir well until mixture is smoothly blended.

Add baking soda to boiling water, stir and add to mixing bowl. Pour over batter and stir slowly until batter is well blended.

Pour batter into a 9-inch square pan or a loaf pan (buttered and floured), or a series of smaller pans or tins. Bake in 350 degree F. oven for 30 - 40 minutes (less perhaps for smaller tins or pans). Test with a toothpick or skewer to see if done. Toothpick will come out clean when inserted into the middle of baking

Remove from oven and let cool in pan. Turn out and dust with icing sugar before cutting.

Enjoy!

Saturday, December 10, 2011

Amaryllis Blooms


What could be a better gift at this time of year than the promise of life and colour? Amaryllis bulbs come in an assortment of pretty colours and the size of the blooms never fail to amaze. It is such an easy gift to put together for someone. All you need is an amaryllis bulb, some potting soil and a container.


If you have ever had the disappointment of growing an amaryllis bulb that put forth luscious green leaves but never developed a bloom, do not despair. I have a small "tip" that will ensure that this never happens again. When you buy a bulb, take a close look at it. If this means opening the box that the amaryllis comes in, then don't be shy, open that box up and have a look inside.

After several large disappointments, I will never buy another amaryllis bulb without first performing this simple inspection:

Look around the top of the bulb for new growth. If there are no tips showing, then put that box back and keep trying until you find a bulb with at least the beginnings of white or green tips showing. (Don't worry that the new growth is white, it will turn green once it has been exposed to the light for a short period.)

You will notice that one tip may look a little different from the other. One tip has a little indent, or notch, at the top (the lower tip in the photo above). This is a flower bud. The tip without an indent (the upper tip in the photo) is a leaf. If you are lucky or willing to check enough bulbs, you will be rewarded by finding bulbs that have not only one flower bud tip, but two!


This amaryllis has two flower buds and several leaves coming up through the middle. Now, here's the next important point. If you buy a kit, your amaryllis bulb will come with a plastic pot of some description. While the plastic pot will do the job and certainly you can use it, why not make your gift a little more pleasing to the eye and to the delight of the recipient by using a lovely pot instead? That doesn't mean that you have to spend a lot of money on an expensive pot. It doesn't even mean that it has to be a new pot! The ceramic pot here was a $1.99 thrift shop find.


Just fill up your pot with some potting soil and place your bulb firmly on top, pressing down gently until it is securely nestled in the soil. (These bulbs like to be exposed at the top.) If you like you can cover the soil with some moss, or pebbles, or anything else you can dream up. Give it a little water and set it in a well-lit spot.


After several weeks, the stems will grow quite tall and the bud or buds will begin to open. Add a festive ribbon and it will be ready to give away. Or, give it to someone as soon as you've potted it and allow the recipient to watch it grow day by day. Once those gigantic trumpet-like flowers appear, it will seem like a little magic has occurred. A burst of colour to brighten a winter's day.

Wednesday, December 7, 2011

Garnishes for Gifts


What could be prettier atop small gifts than vintage earrings or broochs? Scour vintage sales, church bazaars or thrift shops for charming possibilities. And if you've lost an earring of your own, save it to use as a gift garnish.

By choosing carefully, you can use a piece of jewellery that the recipient will want to wear, doubling your gift. If you use an earring as a garnish, consider including the other earring with the gift so the receipient can wear them later on.


Consider your giftwrap and select the perfect embellishment to coordinate or contrast beautifully.


The same set of earrings, used with different paper and ribbon creates a different style.


A little bit of sparkle never hurts, and pearls are always soft and elegant.


This informal trio has light-hearted touches. The child's gift is festooned with a tangle of paper streamers (traditionally used to ring in the New Year).


The other gifts look festive with the addition of tiny dollar-store evergreen trees, pinecones and tied with bits of jute.